1)요소선택자
1-1)아이디선택자
1-2)태그선택자
1-3)클래스선택자
1-4)자손,후손 선택자
1-5)속성선택자
1-6)입력양식선택자
1-7)checked상태 선택자
1-8)selected상태 선택자
2)필터링
2-1)필터링관련 선택자
2-2)필터링관련메서드
2-3)nth
3)요소탐색
3-1)부모관련
3-2)자식관련
1) 요소
jqery를 사용하는 2가지방법
1)다운로드방식
<script src="jquery_3.7.1.js"></script>2) CDN
<script src="https://ajax.googleapis.com/ajax/libs/jquery/3.7.1/jquery.min.js"></script>1-1) 아이디선택자 $(#id명)
<body>
    <h1>선택자를이용한 요소선택</h1>
    <h3>아이디선택자</h3>
    <p>고유한 아이디값을 가진 요소 " 하나만"을 선택하고자 할 떄</p>
    <h1 id="id1">테스트1</h1> <!--순수 자바스크립트 방식-->
    <h1 id="id2">테스트2</h1> <!-- jQuery 방식-->

    <script>
        $(function(){
            document.getElementById("id1").style.color = "red";
            document.getElementById("id1").innerHTML = "h1변경";

            $("#id2").css("color","yellow");
            $("#id2").html("h1변경"); //innerHTML과 관련된기능 수행
            console.log(document.getElementById("id1"));
            console.log($("#id2"))
            // jQuery객체가 나올것임
        })
    </script>

</body>
일반적인 JS로 아이디를 조회하는것과 객체의형태가 다를것임

1-2) 태그선택자 $("태그명")
  <hr>
    <h3>* 태그 선택자</h3>
    <p>JAVA</p><p>MariaDB  </p> <p>HTML</p>
    <h5>CSS</h5><h5>JavaScript</h5><h5>jQuery</h5>
    <script>
        $(function(){
            const p =document.getElementsByTagName("p");
            for(let i =0 ; i<p.length ; i++){
                p[i].style.color = "pink";
            }
            //jQuery방식 : $("태그명")
            $("h5").css("color","blue");//h5 태그들의 글자색을 blue 변경
            //$("선택자") : p or h5 or #id1 태그의 배경색을 yellow로변경
            $("p,h5,#id1").css("backgroundColor","yellow")
        })
    </script>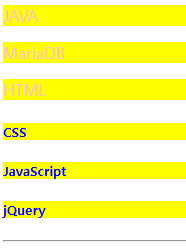
1-3) 클래스선택자 $(".class명)
<hr>
    <h3>*클래스선택자</h3>
    <p>특정클래스 속성을 가진 요소들 선택하고자할 떄</p>
    <h1 class="item">Class1</h1>
    <h1 class="item select">Class2</h1>
    <h1 class="item select">Class3</h1>
    <script>
        $(function(){
            const item = document.getElementsByClassName("item");//클래스속성이item인
            //item : class속성값이 item인  태그들 (배열객체)
            for(let i=0 ; i<item.length ; i++){
                item[i].style.color = "orange";
                item[i].onclick = function(){
                    console.log("클릭")
                }
            }
            //jQuery방식 : $(".class속성")
            $(".select").css("backgroundColor","pink");
            $(".select").click(function(){
                console.log("클릭!")
            })
        })
    </script>

1-4) 자손선택자와 후손선택자
<body>
<h3>자손선택자(>)와 후손선택자( )</h3>
<div style="border: 1px solid black">
    <ul>자손1
            <li>div후손이면서 ul의 자손1</li>
        <li>div후손이면서 ul의 자손2</li>
        <li class="ch">div후손이면서 ul의 자손3</li>
        <li class="ch">div후손이면서 ul의 자손4</li>
        <li>
            <h3>div/ul의 후손이면서 li의 자손</h3>
        </li>
    </ul>
    <h3>자손2</h3>
    <h3 class="ch">자손3</h3>
         </div>
    <script src="jquery_3.7.1.js"></script>
    <script>
        $(function(){
            //div > h3태그의 글자색 white , 배경색 violet
            $("div>h3").css({color:"white"})
            $("div>h3").css({width:"100"})
    // $("div>h3").css("backgroundColor","violet")
            $("div>h3").css({backgroundColor:"violet"})

        //li태그 중 class=ch 인 태그의 배경색을 yellow로변경
        $("li.ch").css({backgroundColor : "yellow"})
        })
    </script>
1-5) 속성선택자
 <h3>* 속성선택자</h3>
    <p>
        선택자[속성] : 해당 속성을 가지고있는 모든요소선택<br>
        선택자[속성=특정값] : 속성값이 특정값과 "일치"하는 모든요소선택<br>
        선택자[속성~=특정값 ] : 속성값에 특정값을 "단어로써 포함"하는 요소선택<br>
        선택자[속성*= 특정값] : 속성값에 특정값을 "포함"하는 요소선택<br>
        선택자[속성^= 특정값] : 속성값이 특정값으로 "시작"하는 요소선택<br>
        선택자[속성 $= 특정값] : 속성값이 특정값으로 "끝"나는 요소선택<br>
    </p>

    <input type="text">text<br>
    <input type="number" class="test test1">number<br>
    <input type="radio">radio<br>
    <input type="checkbox" >checkbox<br>
    <input type="button" value="button" class="test2">button<br>
    <script>
        $(function(){

            //input태그에 class속성을 가진 태그
            $("input[class]").css({backgroundColor:"red"});
            //input 태그에 type속성의 값이 text인 태그
            $("input[type=text]").val("zzzzz")//val: value
            //input태그에class속성명에 test인 속성값을 가지고있는태그
            $("input[class ~= test]").attr("value","1234");
            //input태그의 class명에 st2 속성값을 포함하고있는 태그
            $("input[class *= st2]").val("왕버튼").css({width:100,height:100});
            //input태그의 type의 속성값이 rad로 시작하는 태그
            $("input[type ^= rad]").attr("checked",true);
            //input태그의 type의 속성값이 box로 끝나는 태그

        })
    </script>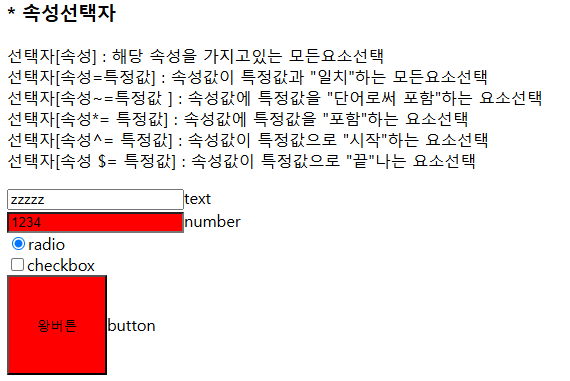
1-6) 입력양식 선택자
$(" : 타입명 ") : 타입명을 가진 태그
ex)$(":text") : text타입의 태그
   <hr>
    <h3>*입력양식 선택자 (input태그의 type속성에따라 요소선택)</h3>
    텍스트상자 : <input type="text" class="aa"><br>
    일반버튼 : <input type="button"><br>
    체크박스 : <input type="checkbox"><br>
    첨부파일 : <input type="file"><br>
    비밀번호 : <input type="password"><br>
    라디오버튼 : <input type="radio"><br>
    초기화버튼 : <input type="reset"><br>
    제출버튼 : <input type="submit"><br>
    <script>//$(:type) ==> type속성명이 type인 태그
        $(function(){
            $(":text").css("backgroundColor","red");
            //type이 button인 태그를 왕버튼으로변경
            $(":button").val("왕버튼").css({width:100,height:50, backgroundColor:"blue"})
            //type=checkbox인 태그를 선택된 상태로변경하기
            $(":checkbox").attr("checked",true);
            //type=file인 태그의 배경색을 연두색으로
            $(":file").css({backgroundColor:"green"})
            //type=password인 태그의 배경색을 노랑색으로 변경하기
            $(":password").css({backgroundColor:"yellow"})
            //radio버튼을 체크상태로만들고 , 가로세로30만들기
            $(":radio").attr("checked","true").css({width:30,height:30})
            //type = reset인 태그의 배경색은 파란색 ,글자색,흰색,테두리없이 , 문구취소로변경
            $(":reset").css({backgroundColor:"blue",color:"white",border:"none"}).val("문구취소")

            //submit클릭 시 입력한비밀번호를 창으로 띄워보기
            $(":submit").click(function(){
                //val() : value속성함수 , value속성값 리턴
                alert("비번 : "+$(":password").val());
                alert("text : "+$(":text").val());//type이 text인 1번쨰 태그
                alert("text : "+$(":text").eq(1).val());//type이 text인 2번쨰태그
            });
            //submit 태그에 마우스커서에 들어온경우 배경색을 purple로변경
        //     .bg{
        //     background-color: purple;
        // }
        /*
            $(":submit").mouseover(function(){
                // $(this).css("backgroundColor","purple")
                $(this).addClass("bg");
            })
            //마우스가 나간경우는 원상태로복구
            $(":submit").mouseout(function(){
                // $(this).css("backgroundColor","")
                $(this).removeClass("bg");
            })
        */

        //hover : mouseover+mouseout 함께 구현 가능
            $(":submit").hover(function(){
                $(this).addClass("bg");//mouseover
            },
        function(){//mouseout
            $(this).removeClass("bg");
        });
         //화살표함수로 구현 ㅣ this(window).
        // 화살표함수에서는 this사용불가

        //화살표함수에 매개변수하나를 주자
        //$(e.currentTarget) : 현재이벤트가발생한객체
        $(":submit").hover((e)=>{
                // $(this).addClass("bg");
                // alert("enter"); 가능
                $(e.currentTarget).addClass("bg");
            },
        (e)=>{
            // $(this).removeClass("bg");
            // alert("out"); 가능
            $(e.currentTarget).removeClass("bg");
        });

        })
    </script>
1-7) checked 상태 선택자
change(function(){}..)으로 값변경시
나타낼 함수를 구현
함수내에서 prop("상태")로 무슨상태인지 확인
ex) $(this).prop("checked") 해당태그는 선택된 태그
<body>
    <script src="jquery_3.7.1.js"></script>
    <hr>
    <h3>* 상태 (checked, selected , enabled , disabled) 선택자</h3>
    <h4> - checked 상태 선택자(radio , checkbox)</h4>
    취미:
    <input type="checkbox" name="hobby" value="game" id="game">
    <label for="game">게임</label>
    <input type="checkbox" name="hobby" value="movie" id="movie">
    <label for="movie">영화</label>
    <input type="checkbox" name="hobby" value="music" id="music">
    <label for="music">음악</label>
    <button id="btn" type="button">실행확인</button>
    <script>
        /*
        $("#btn").click(function(){
            //실행버튼 클릭시 checked상태인요소를 선택해 크기변경
            $("input:checked").css({width:50,height:50});
        })*/
       //checkbox요소들이
       //선택상태 : 크기를크게
       //선택해저 : 크기를 작게

       //change : onchage 이벤트처리 함수
       //(값이 변경 시 발생되는 이벤트처리)
       $(":checkbox").change(function(){
        if($(this).prop("checked")){
            $(this).css({width:50,height:50});
        //label값의 글자크기변경
        //label은 해당태그의 뒤쪽에위치함(next()사용해서찾자)
            $(this).next().css("font-size","50px")
        }
        else{ // checked 속성값이 없는경우
            $(this).css({width:"",height:""});
        }
       })
    </script>
1-8) selected 상태 선택자
$("option : selected)
option태그중 상태값이 selected인태그
 <hr>
    <h4>--selected 상태 선택자 (select>option)</h4>
    국적 :
    <select name="national" >
        <option value="x" selected>선택X</option>
        <option value="ko">한국</option>
        <option value="us">미국</option>
        <option value="eu">영국</option>
    </select>
    <button type="button" onclick="test()">확인</button>
    <br>
    선택한나라 : <span id="result">선택안함</span>
    <script>
        function test(){
            //$("option:selected") : option태그중 상태값이 selected인태그
            $("#result").html($("option:selected").html()+","+$("option:selected").val())
            //class가 result인 태그의 값에 <== 선택된option의 태그내부문(innerHTML) + , + 선택된option의value
        }
    </script>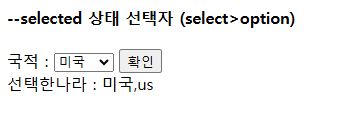
  <hr>
    <h4>- disabled , enabled 상태선택자(input요소들, button 등)/h4>
        <button type="button">활성화</button>
        <button type="button" disabled>비활성화</button>
        <script>
            $("button:enabled").css({backgroundColor:"yellow" , cursor:"pointer"});
            $("button:disabled").css({backgroundColor:"blue" , color:"white"});
        </script>
2)@@ 필터링 @@
2-1) 필터링관련선택자
$("tr:even").css({backgroundColor:"lightgray"})
//tr태그의 홀수행(0부터시작)
$("tr:odd").css({backgroundColor:"yellow"})
//tr태그의 첫번째행
$("tr:first").css({backgroundColor:"black" ,color:"white"})
//tr태그의 마지막행
$("tr:last").css({backgroundColor:"red" ,color:"white"})
   <h3> * 필터링관련 선택자</h3>

    <!-- 6행4열-->
     <table border="1">
        <tr><th>이름</th><th>혈액형</th><th>거주지</th><th>(first(0))</th></tr>
        <tr><td>홍길동</td><td>A형</td><td>서울</td><th>(1)</th></tr>
        <tr><td>김영희</td><td>B형</td><td>울산</td><th>(2)</th></tr>
        <tr><td>김삼순</td><td>O형</td><td>부산</td><th>(3)</th></tr>
        <tr><td>김동호</td><td>AB형</td><td>수원</td><th>(4)</th></tr>
        <tr><th colspan="2">총인원</th><th>4명</th><th>(last(5))</th></tr>
     </table>
     <script>
        $(function(){
           //tr태그의 짝수행(0부터시작)
            $("tr:even").css({backgroundColor:"lightgray"})
            //tr태그의 홀수행(0부터시작)
            $("tr:odd").css({backgroundColor:"yellow"})
             //tr태그의 첫번째행
            $("tr:first").css({backgroundColor:"black" ,color:"white"})
             //tr태그의 마지막행
            $("tr:last").css({backgroundColor:"red" ,color:"white"})
        })
     </script>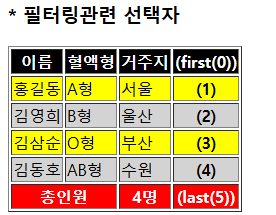
2-2) 필터링관련 메서드
기준이되는 요소중에서 특정요소만을 걸러서 선택해주는메서드(선택요소 반환)
first() : 처음태그
last() : 마지막태그
filter() : 해당하는 태그 처리
eq() : 여러개 태그중 인덱스에해당하는 태그 반환
not() : 아닌 경우
even() : 0부터시작하는 짝수인덱스
odd() : 0부터시작하는 홀수인덱스
text() : innerText() 오직문자 그대로를 전달함
html() : innerHTML() html문 전달가능
<h3>필터링관련메서드</h3>
     <p>
        기준이되는 요소중에서 특정요소만을 걸러서 선택해주는메서드(선택요소 반환)<br>
        first() , last() , filter() , eq() , not() ,even() ,odd()
     </p>

     <h4 class="test">test-1</h4>
     <h4 class="test">test-2</h4>
     <h4 class="test">test-3</h4>
     <h4 class="test">test-4</h4>
     <h4>test-5</h4>
     <h4 class="test">test-6</h4>
     <script>
        $(function(){
            $("h4").first().css("font-size","20px");//h4의처음
            $("h4").last().css("font-size","30px");//h4의마지막

            //filter(선택자) : 해당하는 태그 처리
            //h4태그 중 class='test'인 태그들만!
            $("h4").filter(".test").html("<font color='red'>텍스트변경</font>");

            //h4태그 중 class='test'인 태그들만!
            $("h4").not(".test").css({backgroundColor:"red" ,width:60});
            //html() : innerHTML 관련함수
            //text() : innerText 관련함수
            //eq(인덱스) : 여러개의 태그 중 인덱스에 해당하는 태그선택(0부터시작)
            $("h4").eq(3).text("<font color='red'>eq(3).text</font>")

            //class가 test이면서 짝수인덱스(0부터시작)
            $(".test").even().css({backgroundColor:"green"})
            //class가 test이면서 홀수인덱스(0부터시작)
            $(".test").odd().css({backgroundColor:"yellow"})
        })
     </script>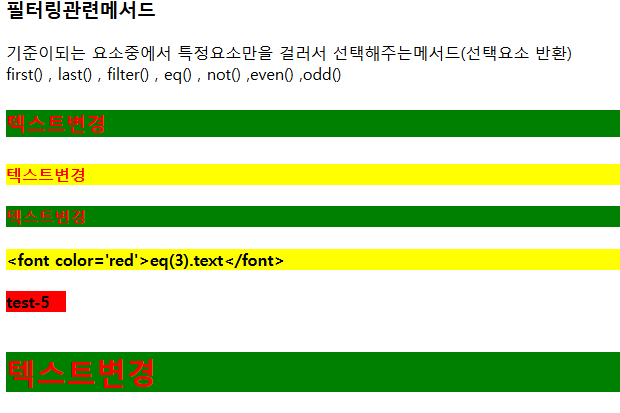
간단예제
     <h4>
      h3태그 짝수인덱스(even)를 노랑바탕 파란글씨 , 홀수인덱스(odd) 검정바탕에 노란글씨
     </h4>
     <h3>H3:Header_0</h3><h3>H3:Header_1</h3><h3>H3:Header_2</h3>
     <h3>H3:Header_3</h3><h3>H3:Header_4</h3><h3>H3:Header_5</h3>
     <script>
      $("h3").odd().css({backgroundColor:"black" , color:"yellow"})
      $("h3").even().css({backgroundColor:"yellow" , color:"blue"})
     </script>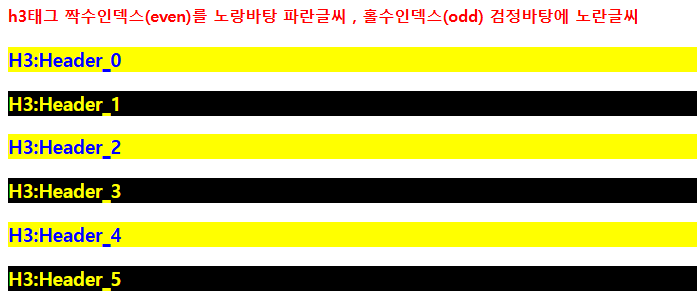
2-3) nth
<h4>
         h1태그 중 3의배수인경우 검정바탕에 흰글씨로<br>
         3배수의 나머지가1인경우 노랑바탕에 파란글씨로
         3배수의 나머지가2경우 파랑바탕에 노란글씨
     </h4>
     <p>
      nth-child(3n+1) : 태그의종류에 상관없이 갯수 설정 <br>
      nth-of-type(3n) : 태그종류별 갯수설정
      둘 다 인덱스가 아닌 순서로처리함(1번부터시작)
   </p>
     <h1>H3:Header_0</h1><h1>H3:Header_1</h1><h2>H3:Header_2(1번쨰)</h2>
     <h1>H3:Header_3</h1><h1>H3:Header_4</h1><h2>H3:Header_5(2번째)</h2>
     <h1>H3:Header_6</h1><h1>H3:Header_7</h1><h2>H3:Header_8(3번째)</h2>
     <script>
      $(function(){
         /*
         $("h2:nth-child(3n)").css({backgroundColor:"black" , color:"white"})
         $("h2:nth-child(3n+1)").css({backgroundColor:"yellow" , color:"blue"})
         $("h2:nth-child(3n+2)").css({backgroundColor:"blue" , color:"yellow"})
         */
         $("h2:nth-of-type(3n)").css({backgroundColor:"black" , color:"white"})
         $("h2:nth-of-type(3n+1)").css({backgroundColor:"yellow" , color:"blue"})
         $("h2:nth-of-type(3n+2)").css({backgroundColor:"blue" , color:"yellow"})
      })
     </script>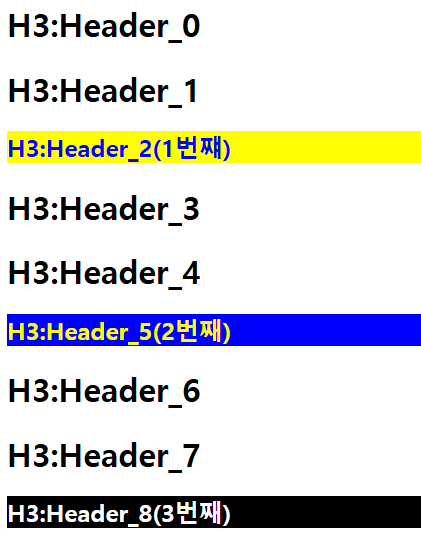
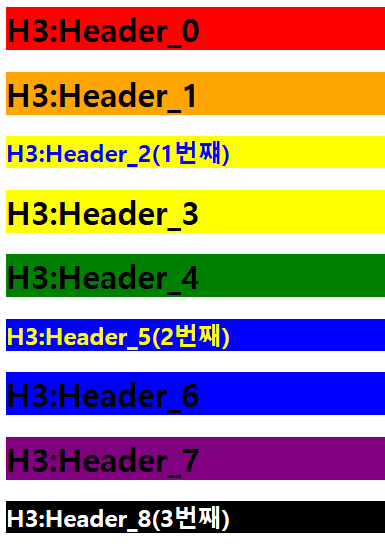
예제
//h1태그의 바탕색을 빨강 , 오렌지 노랑 초록 파랑 남색 설정
      $(function(){
         // $("h1").first().css({backgroundColor:"red"})
         // $("h1").eq(1).css({backgroundColor:"orange"})
         // $("h1").eq(2).css({backgroundColor:"yellow"})
         // $("h1").eq(3).css({backgroundColor:"green"})
         // $("h1").eq(4).css({backgroundColor:"blue"})
         // $("h1").last().css({backgroundColor:"purple"})
         $("h1:first()").css({backgroundColor:"red"})
         $("h1:eq(1)").css({backgroundColor:"orange"})
         $("h1:eq(2)").css({backgroundColor:"yellow"})
         $("h1:eq(3)").css({backgroundColor:"green"})
         $("h1:eq(4)").css({backgroundColor:"blue"})
         $("h1:last()").css({backgroundColor:"purple"})

      })
     </script>
괄호가없는 태그만 봐바!
3) 요소탐색
3-1) 부모관련 메서드
<h4> -$("선택자").parent()</h4>
<span>선택된 요소의 바로 위 상위요소(부모) 하나만을 선택</span>
<h4>-$("선택자").parents()</h4>
<span>선택된 요소의 상위요소 전부 선택</span>
<h4> -$("선택자").parents("선택자")</h4>
<span>선택된 요소의 상위요소들 중 제시된 선택자에 해당하는 요소 선택</span>
<h4> -$("선택자").parentsUntil(선택자)</h4>
<span>선택된 요소부터 제시된 값까지의 모든 상위요소들 선택</span>
<!DOCTYPE html>
<html lang="en">
<head>
    <meta charset="UTF-8">
    <meta name="viewport" content="width=device-width, initial-scale=1.0">
    <title>Document</title>
    <script src="https://ajax.googleapis.com/ajax/libs/jquery/3.7.1/jquery.min.js"></script>
    <style>
        .wrap , .wrap *{ /*wrap과 wrap의 모든하위태그 적용*/
            border: 1px solid lightgray;
            display: block;
            padding: 5px;
            margin: 20px; /*외부와의 간격 15px*/
            color: gray;
        }
    </style>
</head>
<body>
    <h1>탐색 메서드(Traversing)</h1>
    <h3>Anscestors(조상)메서드 : 기준이되는 요소로부터 상위요소들을 선택</h3>
    <div class="wrap">
        <div>div(증조할머니)
            <ul>ul(할머니)
                <li>li(어머니)
                    <span>span(나)</span>

                </li>

            </ul>
        </div>
        <div>div(할아버지)
            <p>p(아버지)
                <span>span(나)</span>
            </p>
        </div>
    </div>
    <p>
        <h4> -$("선택자").parent()</h4>
        <span>선택된 요소의 바로 위 상위요소(부모) 하나만을 선택</span>
        <h4>-$("선택자").parents()</h4>
        <span>선택된 요소의  상위요소 전부 선택</span>
        <h4> -$("선택자").parents("선택자")</h4>
        <span>선택된 요소의  상위요소들 중 제시된 선택자에 해당하는 요소 선택</span>
        <h4> -$("선택자").parentsUntil(선택자)</h4>
        <span>선택된 요소부터 제시된 값까지의 모든 상위요소들 선택</span>
    </p>
    <script>
        $(function(){
            //class='wrap' 후손의span태그의 상위요소(부모)하나 선택
            $(".wrap span").parent().css({color:"red" , border:"2px solid red"})

            // li태그의 상위요소 전부
            //li < x  (여기서는 관련없는 태그까지 적용이됐음)
            $("li").parents().css("color","blue");

            //li태그의 상위요소 중 div태그만 적용
            //li < (x == div)
            $("li").parents("div").css({color:"blue",border:"2px double magenta"})

            //wrap의 하위인 span의 상위요소이면서 div의 하위인 값만
            // .wrap span < x < div
            $(".wrap span").parentsUntil("div").css("color","purple")
        })
    </script>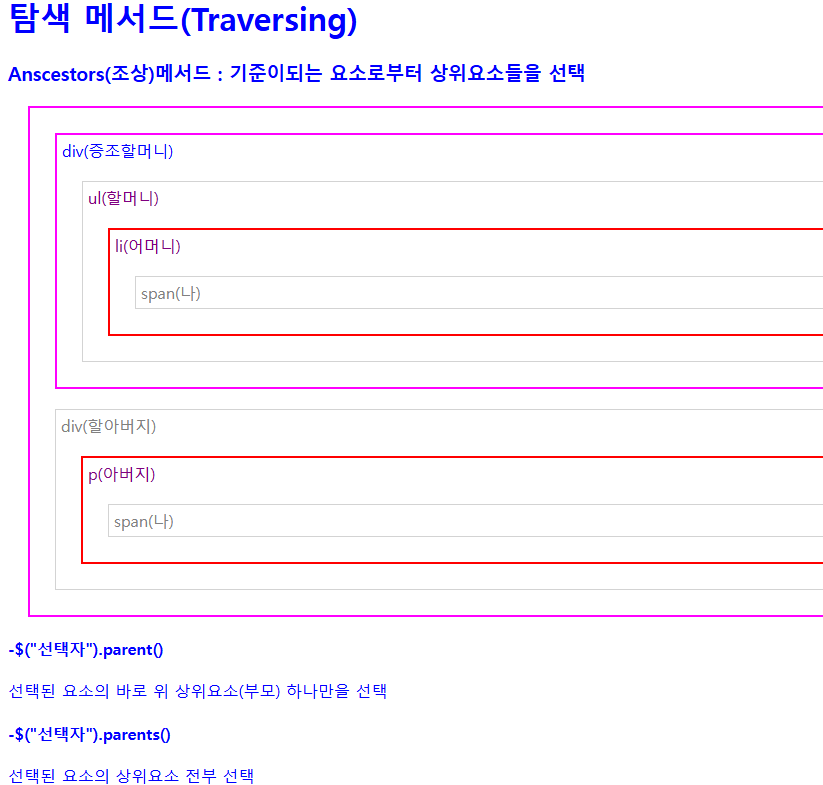
3-2) 자식관련메서드
-$("선택자").children()
선택된요소의 모든 자손요소(바로하위)선택
-$("선택자").children("선택자")
선택된요소의 모든 자손(바로하위)들 중 제시한값과 일치하는 요소만 선택
-$("선택자").find("선택자")
선택된요소의 모든 후손 중 제시한값과 일치하는 요소만 선택
 <h1>탐색 메서드(Traversing)</h1>
    <h3>Anscestors(조상)메서드 : 기준이되는 요소로부터 상위요소들을 선택</h3>
    <div class="wrap">
        <div>div(증조할머니)
            <ul>ul(할머니)
                <li>li(어머니)
                    <span>span(나)</span>

                </li>

            </ul>
        </div>
        <div>div(할아버지)
            <p>p(아버지)
                <span>span(나)</span>
            </p>
        </div>
    </div>
        <h4>-$("선택자").children()</h4>
        <label>선택된요소의 모든 자손요소(바로하위)선택</label>
        <h4>-$("선택자").children("선택자")</h4>
        <label>선택된요소의 모든 자손(바로하위)들 중 제시한값과 일치하는 요소만 선택</label>
        <h4>-$("선택자").find("선택자")</h4>
        <label>선택된요소의 모든 후손 중 제시한값과 일치하는 요소만 선택</label>
<script src="https://ajax.googleapis.com/ajax/libs/jquery/3.7.1/jquery.min.js"></script>
<script>
$(function(){
//자식관련메서드
const style1 = {color:"red",border:"2px solid red"};
const style2 = {color:"blue",border:"2px solid blue"};
const style3 = {color:"green",border:"2px solid green"};
const style4 = {color:"orange",border:"2px solid orange"};
const style5 = {color:"purple",border:"2px solid purple"};
//class=wrap 의 자손(바로하위)
$(".wrap").children().css(style1);
//class=wrap 의 자손의자손
$(".wrap").children().children().css(style2);
//class=wrap 의 자손의자손(li태그만)
$(".wrap").children().children("ul").css(style3);
//class=wrap의 후손 중 (li만)
$(".wrap").find("li").css(style4);
//class=wrap의 후손 중 (span만)
$(".wrap").find("span").css(style5);
})
</script>
4) @@ 예제 @@
예제1
<!DOCTYPE html>
<html>
<head>
    <meta charset="UTF-8">
    <title>실습문제 1</title>
    <script src="https://ajax.googleapis.com/ajax/libs/jquery/3.7.1/jquery.min.js"></script>
</head>
<body>
    <p>결과와 같이 출력되도록  jQuery를 이용하여 구현하기</p>
    <h1>Jquery1<p>Jquery1</p></h1><h1>Jquery1</h1><p>Jquery1</p>
    <h1 class="item">Jquery1 class=item</h1>
    <h1 id="selected">Jquery1 id=selected</h1>
    <h2>Jquery2</h2><h3>Jquery3</h3>
    <script>
<script>

        $("h1:first").css({color:"red"}) //h1의 첫인덱스
        $("h1:first").children().css({color:"blue"}) //h1의 첫인덱스의자식

        $("h1:eq(1)").css({color:"red"}) //2번쨰 인덱스
        $("h1:eq(1)").next().css({color:"blue"}) //2번쨰 인덱스의 다음요소
        $("h1.item").css({color:"green"});//h1중 class가h1
        $("h1#selected").css({color:"orange"});//h1중 id가 selected
        $("h2:last").css({color:"pink"})//h2의 마지막
        $("h2:last").next().css({color:"pink"})//h2의마지막 다음


    </script>
예제2)

<!DOCTYPE html>
<html>
<head>
<meta charset="UTF-8">
<title>실습문제2</title>
<script src="https://ajax.googleapis.com/ajax/libs/jquery/3.7.1/jquery.min.js"></script>
</head>
<body>
	<h3>jquery를 이용하여 select 에서 선택된 이름을 3초후에 alert 창에 띄우기
		자바스크립트의 setTimeout 함수 사용하기<br>
    </h3>
	<select id="sel">
		<option>딸기</option><option>사과</option>
		<option>복숭아</option><option>포도</option>
		<option>오렌지</option>
	</select>

	<script>
		setTimeout(function(){ //3초후에 해당 함수실행
			alert($("option:selected").val()) //option타입이 선택됐을떄의 값
			location.reload();//페이지새로고침
		},3000)
	</script>
</body>
</html>
예제3)
<!DOCTYPE html>
<html>
<head>
<meta charset="UTF-8">
<title>Insert title here</title>
<style type="text/css">
#area {
width: 400px;
height: 150px;
background: #ffff99;
border: 1px solid #6666ff;
}
</style>
<script src="https://ajax.googleapis.com/ajax/libs/jquery/3.7.1/jquery.min.js"></script>
</head>
<body>
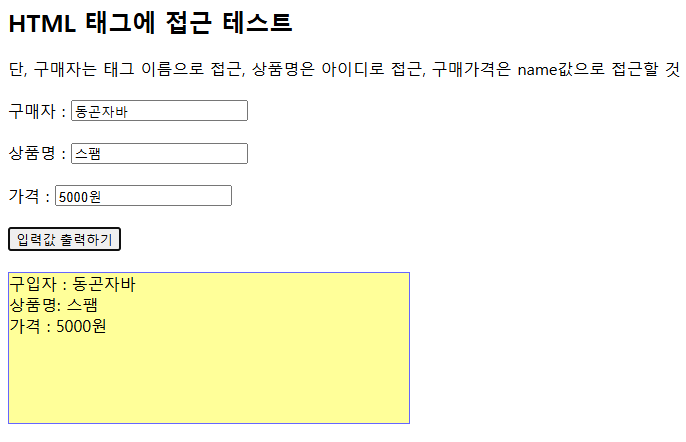
<h2>HTML 태그에 접근 테스트</h2>
단, 구매자는 태그 이름으로 접근, 상품명은 아이디로 접근, 구매가격은 name값으로 접근할 것 <br><br>
구매자 : <input type="text" placeholder="구매자의 이름을 입력하세요.">
<br><br>
상품명 : <input type="text" id="pname" placeholder="구매 상품명을 입력하세요">
<br><br>
가격 : <input type="text" name="price" placeholder="구매 가격을 입력하세요.">
<br><br>
<button onclick="printValue();">입력값 출력하기</button>
<br><br>
<div id="area"></div>
<script>
function printValue(){
let buyer = $("input")[0].value; //태그는여러개이므로 1번쨰태그를가져옴
let names = $("#pname").val();
let price = $("input[name*=pr]").val();
//input태그 중 name에 pr을 포함하는것만
$("#area").html("구입자 : "+buyer+"<br>"
+"상품명: "+names+"<br>"
+"가격 : "+price);
}
</script>
</body>
</html>예제4)
<!DOCTYPE html>
<html>
<head>
<meta charset="UTF-8">
<title>Insert title here</title>
<style>
div {
border: 1px solid red;
height: 150px;
}
</style>
<script src="https://ajax.googleapis.com/ajax/libs/jquery/3.7.1/jquery.min.js"></script>
</head>
<body>
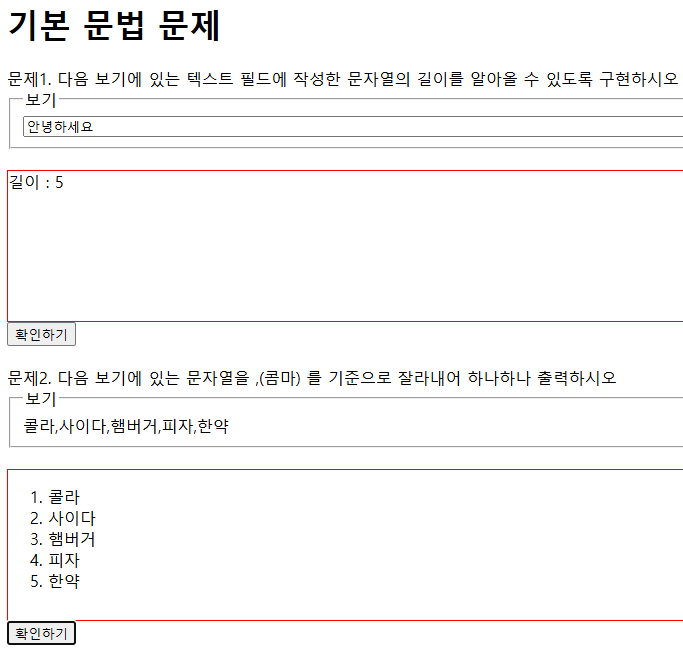
<h1>기본 문법 문제</h1>
문제1. 다음 보기에 있는 텍스트 필드에 작성한 문자열의 길이를 알아올 수 있도록 구현하시오
<fieldset>
<legend>보기</legend>
<input type="text" placeholder="글자를 작성해보세요" size="100" id="text1">
</fieldset>
<br>
<div id="result1"></div>
<button onclick="stringLength();"> 확인하기</button>
<br><br>
문제2. 다음 보기에 있는 문자열을 ,(콤마) 를 기준으로 잘라내어 하나하나 출력하시오
<fieldset>
<legend>보기</legend>
<label id="la1">콜라,사이다,햄버거,피자,한약</label>
</fieldset>
<br>
<div id="result2"> </div>
<button onclick="stringSplit();"> 확인하기</button>
<script src="test4.js"></script>
</body>
</html>
JS코드
function stringLength() {
    let a = $(":text").val(); //type="text"의 value 가져오기
    console.log(a , typeof a);

    $("#result1").html("길이 : "+a.length);
    //a의길이를 result1의 태그에넣기
}


function stringSplit(){
    let a  = $("#la1").html().split(",");
    //innerHTML을 가져온 후 split(",")
   let arr = `<ol>`
   for(i in a){
    arr+=`<li>${a[i]}</li>`;
   }arr+=`</ol>`; //순서가있는리스트로만들어줌

   $("#result2").html(arr);


}
예제5)
<!DOCTYPE html>
<html>
<head>
<meta charset="UTF-8">
<title>실습문제5</title>
<script src="https://ajax.googleapis.com/ajax/libs/jquery/3.7.1/jquery.min.js"></script>
</head>
<body>
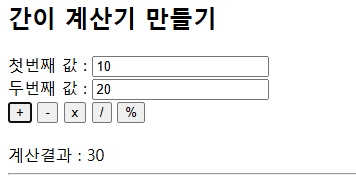
<h2>간이 계산기 만들기</h2>
첫번째 값 : <input type="number" id="num1"><br>
두번째 값 : <input type="number" id="num2"><br>
<input type="button" value="+" onclick="calculator(this.value);">
<input type="button" value="-" onclick="calculator(this.value);">
<input type="button" value="x" onclick="calculator(this.value);">
<input type="button" value="/" onclick="calculator(this.value);">
<input type="button" value="%" onclick="calculator(this.value);"> <br><br>
계산결과 : <span id="result"></span>
<hr>
<pre>
참고 : 각 연산(+, -, *, /, %)들의 버튼들은 input type="button" 으로 작업하시오.
<b>Hint</b>
1. 함수에 인자값을 넘길 경우 함수 처리 방법
ex) -> onclick="calculator(this.value)"; 와 같이
해당 태그의 value값을 함수에 인자값으로 넘길 수 있음
-> function calculator(val) { val을 통해 조건처리 } 처리 할 수 있음
2. switch 문은 자바에서 사용한 switch 문과 동일 합니다.
</pre>
<script src="test5.js"></script>
</body>
</html>JS코드 (calculator에 선택된값(value)를 넘겨주므로 그냥 사용하면된다)
function calculator(e){
    let a = $("#num1").val();
    let b = $("#num2").val();
    console.log( typeof a) //String타입임
    numA = parseInt(a); //String+String = String 이므로
    numB = parseInt(b); //정수로변환하자

    console.log(e);//버튼에따라 계속 바뀔것임

    switch(e){//switch문으로 해당연산을 수행하게함
        case '+' : $("span").html((numA+numB));break;
        case '-' : $("span").html((numA-numB));break;
        case 'x' : $("span").html((numA*numB));break;
        case '/' : $("span").html((numA/numB));break;
        case '%' : $("span").html((numA%numB));break;
    }
}
예제6)
<!DOCTYPE html>
<html>
<head>
<meta charset="UTF-8">
<title>실습문제6</title>
<style>
    div {
        border: 1px solid black;
        background-color: black;
        height: 100px;
        width: 100px;
    }
</style>
<script src="https://ajax.googleapis.com/ajax/libs/jquery/3.7.1/jquery.min.js"></script>
</head>
<body>

	<h3>문제 1. 색상 선택후 변경 버튼을 클릭하면 색상이 변경되도록 만들어 보시오</h3>

	<div id="div1"></div>

	<input type="color" id="selectColor">
	<button onclick="changeColor();">변경</button>
</body>
</html>
JS코드
function changeColor(){
    let c = $("input[type=color]").val(); //선택한색의 16진수값
    // let c = $(":color").val();jQuery에서는 color는 지원하지않음

   $("#div1").css("backgroundColor",`${c}`);
   //div1의 태그내의 backgroundColor를 선택한값으로바꿔줌
}
예제6-2) $("선택자").css("css문");
<h3>문제 2. 버튼에 따른 크기 조절이 가능하게 만들어 보시오</h3>

	<div id="div2"></div>

	<button onclick="sizeChange(50);">50x50</button>
	<button onclick="sizeChange(100);">원본(100x100)</button>
	<button onclick="sizeChange(200);">200x200</button>
	<script src="test6.js"></script>
function sizeChange(e){
$("#div2").css({width:`${e}` , height:`${e}`})
//class=div2인 태그를 조회 후
//css(width,height)를 설정해줌
}
'JavaScript' 카테고리의 다른 글
| 부트캠프40일(jQuery 요소관련, 이벤트핸들러) (0) | 2025.03.31 |
|---|---|
| 부트캠프38일차 (게임들 , jquery , 예제) (0) | 2025.03.27 |
| 부트캠프37일차(BOM,game) (0) | 2025.03.26 |
| 부트캠프35일차 (JS(시간함수,Event,배열) (0) | 2025.03.21 |
| 부트캠프34일차(JS[요소조회출력, 문자열,Math, 조건문]) (0) | 2025.03.20 |