반응형
1)prototype 예시
2) 이미지catch게임
3) 다양한 실습문제
1) prototype 예
prototype : 공통데이터를 프로토타입에저장해서사용가능
생성자 함수 내부 this.__proto__.속성=값 or 함수
생성자 함수 외부 함수명.prototype.속성 = 값 or 함수
<!DOCTYPE html>
<html>
<head>
<meta charset="UTF-8">
<title>Array 객체에 contain 메서드 추가하기</title>
</head>
<body>
<script type="text/javascript">

const a = [273,32,103,57,52];

//배열객체의 메서드 생성
Array.prototype.contain = (num)=>{
   return a.indexOf(num) >=0 ;
   //없는 요소를 넣으면 -1이 반환
   // false를 반환할것임
}
// a.contain = (num)=>{
//    return a.indexOf(num) >=0 ;
// } 다음과같이 해당배열에만 메서드추가가능


document.write("273 in [273,32,103,57,52] : "+a.contain(273) + "<br>") //true
document.write("0 in [273,32,103,57,52] : "+a.contain(0) + "<br>") //false

</script>
</body>
</html>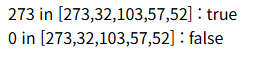
2)이미지잡기게임 구현
랜덤한 위치값,
객체생성.
객체의 prototype 생성
setInterval(함수,시간) : 시간마다 함수가실행
을 이용함
<!DOCTYPE html>
<!-- webapp/20230327/exam1.html
  이미지 잡기 게임 구현하기
  사과이미지(apple.gif)를 클릭하면 딸기 이미지(strawnerry.gif)로 변경 하고 멈추도록
  프로그램 작성
  이미지의 크기는 가로세로 35px 로 지정한다.-->

<html>
<head>
<meta charset="UTF-8">
<title>이미지 잡기 게임</title>
<style>
  h3{
    text-align: center;
    color: red;
  }
  img{
    width: 50;
    height: 50px;
  }
</style>
</head>
<body>
  <h3></h3>
  <script type="text/javascript">
       function nextRandomInteger(limit){
            return Math.round(Math.random() * limit); //0 ~ limit범위의 정수리턴
        }

        function randomSpeed(maxSpeed){
            return (Math.random() * maxSpeed) - (Math.random() * maxSpeed);
            //-4 ~ 4 사이의 임의 실수
        }
        let canvasWidth = 700; // 이동 가로크기
        let canvasHeight = 500; // 이동 세로크기
        let total = 10;//글자수
        function MovingImage(){ // 생성자(x,y,vX,vY,body의 변수보유)
            this.x = nextRandomInteger(canvasWidth); //랜덤하게 x의 위치를 정해줌
            this.y = nextRandomInteger(canvasHeight);
            this.vX = randomSpeed(4);
            this.vY = randomSpeed(4);
            this.im = document.createElement("img");//h1태그를만든다
            this.im.src = "img/apple.gif"; // 초반이미지
            this.im.setAttribute("style","position:absolute");

            document.body.appendChild(this.im); //  body에 img 추가

            this.im.onclick = function(){ //이미지클릭 시
              --total;
              document.getElementsByTagName("h3")[0].innerHTML =(`남은 이미지 수 : ${total}`);
              this.src = "img/banana.jpg";//im의src를 다음과같이변경
              //여기서의 this : img(클릭이벤트가발생한 곳)
            }

          }


          MovingImage.prototype.move = function(){
            //경로가 절대경로로 돼 있을수도있기때문에 include함수를이용해
            //포함된 경우 if문 동작
            if(this.im.src.includes('img/banana.jpg')){return;} //잡힌글자(움직임X)
            if(this.x < 0 || this.x > canvasWidth){ //가로범위벗어날 시
                this.vX *= -1;// vx를 반대방향으로 바꾸기
            }
            if(this.y < 0 || this.y > canvasHeight){
                this.vY *= -1; // vY를 반대방향으로
            }
            this.x += this.vX;//가로위치값변경(-4~4사이의값이 추가됨)
            this.y += this.vY;//세로위치값변경(-4~4사이의값이 추가됨)
            this.im.style.left = this.x +"px";//왼쪽의 공백
            this.im.style.top = this.y +"px";//위쪽에서의 공백
        }
        //onload : 화면이 시작됐을경우 발생되는이벤트
        window.onload = function(){
            let movingTexts = [];
            for(let i =0 ; i<10 ; i++){
                movingTexts.push(new MovingImage());
            }//창이 켜질 떄 MovingText객체 10개 생성

            // 1/60초 마다 계속실행되는 함수
            let game = setInterval(function(){
                for(let i in movingTexts){
                    if(total<4){//남은A의 갯수가 4개 이하면종료
                        alert("게임종료");
                        clearInterval(game);//함수중지
                        return;
                    }
                    movingTexts[i].move(); //모든movingText객체를 move
                }
            },1000/60);
        }


  </script>

</body>
</html>
3)조금의실습문제
jQuery $ 를
이용하기위해 script에 다음과같이적자
(CDN방식)
<script src="https://ajax.googleapis.com/ajax/libs/jquery/3.7.1/jquery.min.js"></script><!DOCTYPE html>
<html lang="en">
<head>
<meta charset="UTF-8">
<meta http-equiv="X-UA-Compatible" content="IE=edge">
<meta name="viewport" content="width=device-width, initial-scale=1.0">
<title>자바스크립트 실습문제</title>
<script src="https://ajax.googleapis.com/ajax/libs/jquery/3.7.1/jquery.min.js"></script>
<style>
*{box-sizing: border-box;}
#calculator{
margin:auto;
border:2px solid black;
}
#calculator input[type="text"]{
width:210px;
height:50px;
font-size:2em;
font-weight: bold;
text-align:right;
border:1px solid black;
overflow:hidden;
}
#calculator input[type="button"]{
font-size:1.5em;
font-weight:bold;
width:50px;
height:50px;
}
</style>
</head>
<body>
<h2>
1. 실행 버튼 클릭시 사용자에게 알람창(prompt)으로 "메세지를 입력하세요"문구를 출력해주고 <br>
이때 입력받은 내용이 div#test1에 출력될 수 있도록 하시오. <br>
단, 사용자에게 입력받은 값이 없을 경우 "메세지가 입력되지 않았습니다." 가 출력될수 있도록 하시오.
</h2>
<button >실행</button>
<!-- <button onclick="test1()">실행</button> -->
<div id="test1"></div>
<hr>
<h2>
2. 실행 버튼 클릭시 사용자에게 알람창(confirm)으로 "개인정보활용에 동의하시겠습니까?"를 출력해주고 <br>
확인을 누르면 "당신의 개인정보가 유출되었습니다", 취소를 누르면 "당신의 개인정보 유출을 막았습니다" 라는 <br>
메세지가 div#test2에 출력될 수 있도록 하시오.
</h2>
<button onclick="test2();">실행</button>
<div id="test2"></div>
<hr>
<h2>
3. 실행 버튼 클릭시 10개의 랜덤(1~100)값을 발생시켜 해당 랜덤값을 담은 배열을 만들고 <br>
해당 배열을 내림차순 정렬 한 후 해당 숫자들이 div#test3>ul 안에 총 10개의 li 요소로 출력될 수 있도록 하시오.
</h2>
<button onclick="test3();">실행</button>
<div id="test3">
<ul></ul>
</div>
<hr>
<h2>
4. input[type=text name=img]인 요소에 화면에 출력하고자 하는 이미지의 경로를 입력받은 후에 <br>
출력 버튼 클릭하면 div.img-container 요소 내에 사용자가 입력한 주소의 img가 200X200크기로 출력될 수 있도록 하시오.
</h2>
<input type="text" name="img">
<button onclick="test4();">출력</button>
<div class="img-container"></div>
<hr>
<h2>
5. 아래 태그의 데이터를 확인하기 버튼을 클릭하면 모두 가져와 3글자 이상인 데이터만 div#checkStr에 출력하기
</h2>
<div class="data-container">
<p>가나다라</p>
<p>abcde</p>
<h3>썬칩</h3>
<h4>홈런볼</h4>
<span>초코칩쿠키</span>
<p>칸쵸</p>
<h4>초코파이</h4>
<h2>칙촉</h2>
</div>
<button onclick="test5();">확인하기</button>
<div id="checkStr"></div>
<script src="test4.js"></script>
</body>
</html>// function test1(){
// let prom = prompt("메세지를 입력하세요");
// if(prom.length ==0 ){
// alert("메시지가 입력되지않았어요")
// }
// else{
// document.querySelector("#test1").innerHTML = prom;
// }
// }
let but = document.getElementsByTagName("button")[0];
but.onclick = function(){
let prom = prompt("메세지를 입력하세요");
if(prom.length ==0 ){
alert("메시지가 입력되지않았어요")
}
else{
document.querySelector("#test1").innerHTML = prom;
}
}
//-----------------------------------------------------------------------
function test2(){
let con = confirm("개인정보 동의?");
if(con){ //con은 확인 :true 반환 // 취소 : false 반환
$("#test2").html("개인정보가유출"); //jQuery방식
// document.querySelector("#test2").innerHTML = "개인정보유출"
}
else{
$("#test2").html("당신의 개인정보 유출을 막았습니다");
}
}
//-----------------------------------------------------------------------
function test3(){
let arr = [];
while(arr.length <= 10){
let ran =parseInt((Math.random()*100)+1);
console.log(ran)
if(arr.includes(ran)){//중복숫자 방지
break;
}
else{
arr.push(ran);
}
}
arr.sort((a,b)=>{return -1*(a - b)});
//배열은 숫자로 정렬이 제대로되지않음(아스키코드)
let u = document.querySelector("#test3>ul");
document.ul.appendChild()
for(let i=0 ; i<arr.length ; i++){
u.innerHTML += `<li>${arr[i]}</li>`
}
}
//-----------------------------------------------------------------------
function test4(){
let imText = document.querySelector("input[name='img']").value;
document.querySelector(".img-container").innerHTML+=
(`<img src='${imText}' witdth="200" height="200">`);
//jQuery방식
// let imText = $("input[name='img']").val();
// $(".img-container")
// .html(`<img src='${imText}' witdth="200" height="200">`);
}
//-----------------------------------------------------------------------
function test5(){
let data = document.querySelectorAll(".data-container>*");
let result = document.querySelector("#checkStr");
//.data-container>* : class(data-container)태그의 모든 자식태그
for(i=0 ; i<data.length ; i++){
if(data[i].innerHTML.length >=3){
// result.innerHTML += data[i].innerHTML+" ";
// result.appendChild(data[i])
//복제할요소객체.cloneNode(논리값) : 복제된요소객체
let copy = data[i].cloneNode(true);
// true : textNode까지 모두복제 / false : elementNode만복제
result.appendChild(copy);//#checkStr의 하위에 집어넣기
}
}
}
'주말공부 or 복습' 카테고리의 다른 글
| 주말공부 (joinForm리팩토링 및 pw찾기 시 랜덤한번호(임시비번생성 )) (0) | 2025.04.27 |
|---|---|
| 주말복습 7( HTML) (0) | 2025.03.16 |
| 주말복습6 (DB) (2) | 2025.03.09 |
| 주말복습5 (0) | 2025.03.03 |
| 주말복습4(Collection(List,set,Map) (0) | 2025.03.01 |