반응형
2)스프링 기초
2-1)lombok
2-2) maven
2-3) 스프링 예제
2-4) AOP (관점 지향)
2) 스프링 기초
2-1)lombok
lombok-1.18.30.jar
1.92MB
해당파일을 클릭해 install해준후

주요 어노테이션

사용 예
package ex01_lombok;
/*@Getter
@Setter
@ToString
@EqualsAndHashCode
*/
@NoArgsConstructor
@AllArgsConstructor
@Data //생성자를 제외한 어노테이션을 한번에처리
public class Hiru {
	String id;
	String pass;

	public static void main(String[] args) {
		Hiru h = new Hiru("zz","1234");
		Hiru h2 = new Hiru();
		h2.setId("ㅋㅋ");
		h2.setPass("9977");
		System.out.println(h);
		System.out.println(h2);
	}

}
Builder의 동작원리 (@Builder이용 X)
package ex01_lombok;

public class Ex02_User {
	private String id;
	private String pw;

	public Ex02_User(Builder builder) {
		this.id = builder.id;
		this.pw = builder.pw;
	}

	public static Builder builder() {
		return new Builder();
	}

	public String toString(){
		return "USER : [id :"+id+", pw : "+pw+" ]";
	}

	//내부클래스
	public static class Builder{
		private String id;
		private String pw;
		public Builder id(String id) {
			this.id = id;
			return this;
		}
		public Builder pw(String pw) {
			this.pw = pw;
			return this;
		}
		public Ex02_User build() {
			return new Ex02_User(this);
		}
	}

	public static void main(String[] args) {
		//User.builder() : 내부클래스의 객체
		//id() : 내부클래스의 메서드 (User.builder.id(String))
		Ex02_User e1 = Ex02_User.builder().id("하이루")
							.pw("1234").build();
		//setter이용하지않고 객체하나를 뚝딱

		System.out.println(e1);

	}
}
@Builder 사용
package ex01_lombok;

@Builder
@ToString
public class Ex03_Builder {
	private String id;
	private String pw;
	private String email;

	public static void main(String[] args) {
		Ex03_Builder pw2 = Ex03_Builder.builder()
			.id("동곤유").pw("7788").email("yy@nn.com").build();

		System.out.println(pw2);
	}
}
2-2) maven
maven project 생성


다음과같이 생성될거임
pom.xml 작업
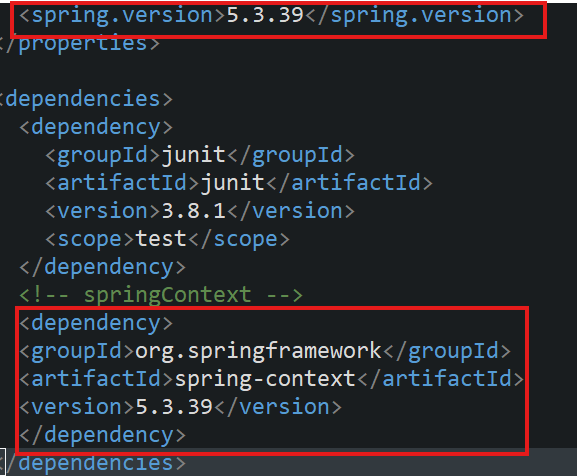
https://mvnrepository.com/artifact/org.springframework/spring-context/5.3.39
해당링크를 이용해 springcontxt 5.3.39의 의존성코드를 받아온 후
다음과같이 추가를 해주자


javax Annotation의 의존성도 추가해주자!
2-3) 스프링 예제
package kr.gd.ex02_maven;

import org.springframework.context.annotation.AnnotationConfigApplicationContext;

public class Main1 {
	public static void main(String[] args) {
		//이 설정 클래스를 기반으로 Spring 컨테이너가 빈을 생성하고 관리합니다.
		AnnotationConfigApplicationContext ctx =
				new AnnotationConfigApplicationContext(AppCtx.class);

		//이름이 "excutor"이며 타입이 Excutor인 빈을 가져옴
		//exec는 Worker객체가 @Autowird로 인해 주입된 상태
		Excutor exec = ctx.getBean("excutor",Excutor.class);
		exec.addUnit(new WorkUnit());
		exec.addUnit(new WorkUnit());
	}
}
package kr.gd.ex02_maven;


import org.springframework.context.annotation.ComponentScan;
import org.springframework.context.annotation.Configuration;

@Configuration //spring 환경 설정해주는 기능

//kr.gd.ex02_maven 패키지 내의 클래스를 spring에 등록
@ComponentScan(basePackages = {"kr.gd.ex02_maven"})
public class AppCtx {

}
package kr.gd.ex02_maven;
import org.springframework.beans.factory.annotation.Autowired;
import org.springframework.stereotype.Component;
/*
* @Component
* 해당 클래스 파일의 객체를 생성
* ex) Excutor의 객체 :
* "excutor"이름으로 ApplcationContxt객체에저장
*/
@Component
public class Excutor {
//컨테이너에서 Worker타입의 객체인 worker를 주입해줌
//autowired를 사용하지않는다면 초기화되지않은 객체이므로
// nullpointException이 발생
@Autowired
private Worker worker;
public void addUnit(WorkUnit unit) {
worker.work(unit);
}
}package kr.gd.ex02_maven;
import org.springframework.stereotype.Component;
@Component //"worker"이름으로 ApplcationContxt 객체에저장
public class Worker {
public void work(WorkUnit unit) {
System.out.println(this+" :work : "+unit);
}
}
2-4)AOP (관점 지향)

<dependency>
			<groupId>org.aspectj</groupId>
			<artifactId>aspectjweaver</artifactId>
			<version>1.9.6</version>
		</dependency>
전에 만들었던 pom.xml과 동일하게 만든 후 aspectj 의존성 추가
kr.gd.aop.AppCtx.java
package kr.gd.aop;

import org.springframework.context.annotation.ComponentScan;
import org.springframework.context.annotation.Configuration;
import org.springframework.context.annotation.EnableAspectJAutoProxy;

@Configuration //spring 환경 설정하는 클래스 의미
//annotation 패키지에 속한 클래스중 @Compoenet 가진 클래스의 객체를 생성 후 저장
@ComponentScan(basePackages = {"annotation"})

@EnableAspectJAutoProxy //AOP설정함 , AOP관련 어노테이션 기능 사용
public class AppCtx {

}
main.main1.java
package main;

import org.springframework.context.ApplicationContext;
import org.springframework.context.annotation.AnnotationConfigApplicationContext;

import annotation.Article;
import annotation.ReadArticleService;
import kr.gd.aop.AppCtx;

public class Main1 {
	public static void main(String[] args) {
		//ApplicationContext : 컨테이너(객체들을 저장하는공간)
		ApplicationContext ctx =
				new AnnotationConfigApplicationContext(AppCtx.class);
		//AppCtx에 @cofiguration이 없다면 동작하지않을거임(spring 환경설정)

		ReadArticleService service =
				ctx.getBean("readArticleService",ReadArticleService.class);
		//타입은 ReadArticleService이긴하지만 Impl(구현체)을 호출할거임
		//(@Component("readArticleSerice") 로 설정해놨음)

		try {
			//a1 : Article id값이 1인객체
			Article a1 = service.getArticleAndReadCnt(1);
			Article a2 = service.getArticleAndReadCnt(1);
			System.out.println("a1.hashCode() : "+a1.hashCode());
			System.out.println("a2.hashCode() : "+a2.hashCode());
			System.out.println("[main]a1==a2 : "+(a1==a2));
			service.getArticleAndReadCnt(0);
		}
		catch (Exception e) {
			System.out.println("[main1_Exception] : "+e.getMessage());
		}
	}
}
annotation.ReadArticleService , ReadArticleServiceImpl
package annotation;

public interface ReadArticleService {
	Article getArticleAndReadCnt(int id) throws Exception;
}
//------------------------------------------------------------
@Component("readArticleService")
//ReadArticleService의 구현체Impl
public class ReadArticleServiceImpl implements ReadArticleService{
	@Override
	public Article getArticleAndReadCnt(int id) throws Exception {
		if(id==0) {
			throw new Exception("0입력 불가");
		}
		return new Article(id);
	}

}
annotation.Article
package annotation;

import org.springframework.stereotype.Component;

import lombok.EqualsAndHashCode;
import lombok.Getter;
import lombok.NoArgsConstructor;
import lombok.Setter;

@Getter
@Setter
@NoArgsConstructor
//@Component 아마 해당어노테이션을 이용해 객체를 등록해준다면 autowird를 사용할수도있으며
//@EqualsAndHashCode 객체의 주소값으로비교하지않고 값으로 동등성을 따질거임
public class Article {
	private int id;
	private ArticleDao dao;
	public Article(int id) {
		this.id=id;
	}
}'Spring' 카테고리의 다른 글
| 부트캠프83일차(회원정보수정, idpw찾기 , 장바구니) (3) | 2025.06.09 |
|---|---|
| 부트캠프82-1일차 ( spring에서의 예외처리) (1) | 2025.06.07 |
| 부트캠프82일차 ( 사용자등록) (1) | 2025.06.05 |
| 부트캠프81일차 spring 소규모프로젝트 (controller , 상품등록,상품업데이트,삭제) (0) | 2025.06.04 |
| 부트캠프80일차 (AOP , 어노테이션정리 , spring소규모프로젝트) (0) | 2025.06.02 |